Monday, June 16, 2014

EVALUATION


EVALUATION

 
My intentions for this project were to show how digital media can enrich the possibilities of experimentation and also how sometimes digital media can be more favourable over traditional techniques. Like the brief required, I was to create a final piece, an image constructed purely out of words and with the help of my experiments and research, show how digital typography/media really helps when experimenting and how it gives you much more flexibility than traditional media and techniques would. My plan for my final print was to create an image out of typography which also has strong contextual information behind it that also has a presentable and interesting aspect to the eye of the viewer and I believe I successfully did that as my final piece has good aesthetics and the contextual information is really clear as the words and the shape they create link together perfectly.


One of the three artists I researched is Mary Kate McDevitt, and most of her work is based on traditional media and techniques, but the thing that influenced me from her work is the aspect of it and the messy spontaneous aesthetics in the colors she uses. Another one of the artist that I investigated on is Craig Ward, and his work is more digital based involving different Photo shopped fonts and effects. From this research I attempted to combine both of their styles where my work will be made through the use of digital media and add Mary’s traditional look to some elements in the image. The 3rd artist I researched is Jamie Reid, and what I picked up from this research is the ability to show contextual information in my work as this aspect stands out mostly to me from his artwork.


Throughout this project, from beginning to the end, I perfected my skills in Photoshop and use of digital media and I also learned new techniques and ways to manipulate my work, which really helped me make my final piece as effective and impressive as I could. The knowledge that allowed me to complete this project was provided to me by my teacher and also a big part of it from my research which really influenced my work.


One thing about my final piece that I feel I succeeded in is the contextual information behind the design and how the text and the image it creates really go hand in hand to make the viewer think more about this piece and about the artists intentions. If I were to go back and work some more on this project, I would have wanted to make 2 or 3 more final pieces in this style so I had a greater range to choose from as my final piece, and that would have shown the process of thought and how I experimented with digital media all the way until the end of the project.


Overall I am happy with the final outcome of my typography project, and I believe that my final piece is effective and has a great impact on the viewer as the contextual information and the techniques and tools used go really well hand in hand to create the final piece presented in this blog.


Printscreens: Final Piece

Print screens
 
Here I will show you the steps I went through when I created my final piece for this project. Here you will get an in depth description of the techniques and tools I used when I created my final typography piece.
 
The first step is to open a new page on Photoshop and make sure that the background is blank. You will need to create your set text brush so you can apply the text as a brush. Use the text tool (T) from the tool bar and type the text you want. You are able to change the font, size and color of your text so get creative.


You will create your text brush by using the rectangular marquee tool from your tool bar, and on an empty background, select the area of the text you want to make into a brush. After you selected it, go to edit in the top bar, click define brush preset, re-name your text and ‘’voilĂ ’’, you created your first text brush. You can use the same technique to make as many brushes as you’d like to.


Now that you have successfully created your new text brush, click on the brush tool as shown in the image and you are ready to start experimenting.  Like shown in the image below, click the button circled with the red outline and the panel showed on the right hand side like in the image should open. This panel will allow you to customize your brush, by allowing you to rotate the brush, the trail behind your brush, the roundness of your brush, size, spacing, hardness etc. This was my favourite part as I had the ability to manipulate my brush and give me the flexibility needed to make this piece. Feel free to experiment with all the fetures thtat the brush tool gives you and your work will be much more effective .


The next step I went through, was to select an image that I was going to work on, decrease the opacity of the image so it’s easier for me to work on it, use the pen tool to outline the section of the image I was going to work on (right click inside the outline and click make selection to select area) and have my text brush ready to start applying the text. Make sure that all the text applied is on a new layer and not on the image itself. I also made a layer which is the background and filled it with the color I wanted my final piece to be presented on.


Now that you have your area selected, use the brush tool to apply the text. It would be helpful to keep a smaller copy of the image to the side so when you apply the text, you can use that image to sample the colors for separate sections of the image to give it a more realistic look. You can take a sample of a color by holding alt key while using the brush tool and clicking the color form the copy of the image. Remember to use the brush settings from the panel presented before to suit your image if it’s tilted, of if you have any other specific need for your image.
In the next 4 steps I will show you how I created the blood drop from the word kill in my piece. First start by using the text tool from the tool bar to write your text in the color and font desired. I used red because it has to mimic blood and I chose a bigger and bolder font so it’s easier to read the text after a warp it in the next step.


The next thing I did was that I brought an image of a water drop as a template for the blood dripping of my final piece. Press ctrl + T to resize and rotate your image and lay it on top of the water drop and another thing you could do is decrease the opacity of the water drop so you can see your text better when warping. The most essential step is that you rasterize your text, and you do this by right clicking on the text in your layer panel and click on ‘’Rasterize Type’’ button, and this will make your text into an image so now you can manipulate it.


Now that you have rasterized your text layer, you will have to select the layer and click ‘’edit’’ in the task bar at the top, click ‘’transform path’’ and the click ‘’warp’’. By doing this a grid should appear on top of your image just like in the print screen presented that will allow you to warp the text into the desired shape.  You can youse the square anchor point to place them on the edge of the image and use the handles extending from the anchor points to change the shape of your image.
The final step I went through was to add some effects to my background, and for this I used copyright free images from the internet and overlaid them on top of the background and decreased opacity so it blended. You could achieve the same background effects by downloading some brushes from the internet to give more depth to your image and make it more impressive.


These are all the techniques and tools I used to create my final piece. I used the same ‘’selection and painting in the selected area’’ technique for the blade of the knife and the blood stains on the blade I made them by free hand to give it that messy and spontaneous look. The techniques I used were quiet basic, but used in the right may I believe I managed to create an effective piece that will have a significant impact on the viewer.

Tuesday, June 10, 2014

Final Piece


 -Final Piece-


I chose this as my final piece because I believe that the techniques and tools used are very effective and it shows how digital media can enrich the possibilities of experimentation. My main hero image is the knife in the centre that has been created out of pure text by using a text brush.

 In the background I used a copyright free image to give my piece a lot more depth, and I managed this by placing the image behind all layers and decreasing opacity. I also considered the contextual information behind my design and the process of thought is successfully illustrated in this piece.

The concept behind this typography design is about how words can be as harmful as a knife, and the assimilation between the two is really effective. If I were to go back and change some aspects about this it would have to simply be experimenting with different fonts, colors and try out different ways/objects to create out of text. I also think that my final piece reflects some of Mary Kate McDevitt’s work but more digitized, as her work is mostly based on traditional media.

Overall, I am happy with the final outcome of this piece and I believe that this is a presentable final piece that met the requirements on the brief.

Monday, May 19, 2014

Advantages of Digital Media


Digitally Manipulated Typography


This is the Digitally Manipulated image i'm descrimbing on thi page. This is a
good image to analyse because it has been heavily edited and it's easy to
notice the processes.
Just by looking at this picture for 2 seconds you are able to tell straight away that it has been made through the use of digital media. The layers that compose this image give it a cybernetic, digital aspect that was very successfully blended with the creativity behind this image. Another thing that gives away the process used to create this piece is the fact that creating such complex image by using traditional media without the help of digital manipulation would have been a very long and complicated procedure and errors could occur much more often than when using digital media. One of the main advantages of using digital media over traditional techniques and materials is that if errors are made you can retrace your steps to fix the mistakes, and therefore this enriches the possibilities of experimentation, which is in my opinion the greatest thing about digital manipulation in typography.

 
The compositional elements that are in this image are: the silhouette of someone sitting down as the subject of the image, the silhouette is created from text/typography, the background of a dull and plain colour and on the bottom left side of the piece a block of color that resembles concrete or the pavement that the person is sitting on.

 
The most complex element in this image is the shape of the boy made out of words. There are more than one techniques through which this can be achieved, but the most obvious one would be to trace the outline of the model, activate the traced area and use pre-made brushes out of words to create this unique and digital effect. After that you could use a brush tool for the details, such as the patterns on his jeans or for fading out effects for tone on the line. On the other hand, if you were to make this through the use traditional media, the process would have taken a lot more time and the number of resources needed to make this would have been in a greater number. Also, because of the difficulty of creating such an image by hand, mistakes would happen much more often than when using digital media, and like I mentioned before these mistakes are remedied a lot easier on a digital program than on your physical canvas.

 
 Digital media has definitely revolutionised not only contemporary typography but also influenced most other areas in art such as photography and graphic arts.  There are many advantages of using digital media instead of traditional techniques and material and the possibilities are limitless and creativity combined with some knowledge will help you discover them.


This is an example of Traditional Media and I used this image to compare it to
to the digital pieceabove.

Warped Text // Printscreens


          Warping Text


In this step by step guide you will learn how to warp text to any shape you want. This technique is very effective as it allows you to experiment further into finding the style of typography that best suits you. This specific type of typography is more associated with the psychedelic & hippie era from the 60’s but it can be very well be adapted into your own work and the style you want it to be.


STEP 1

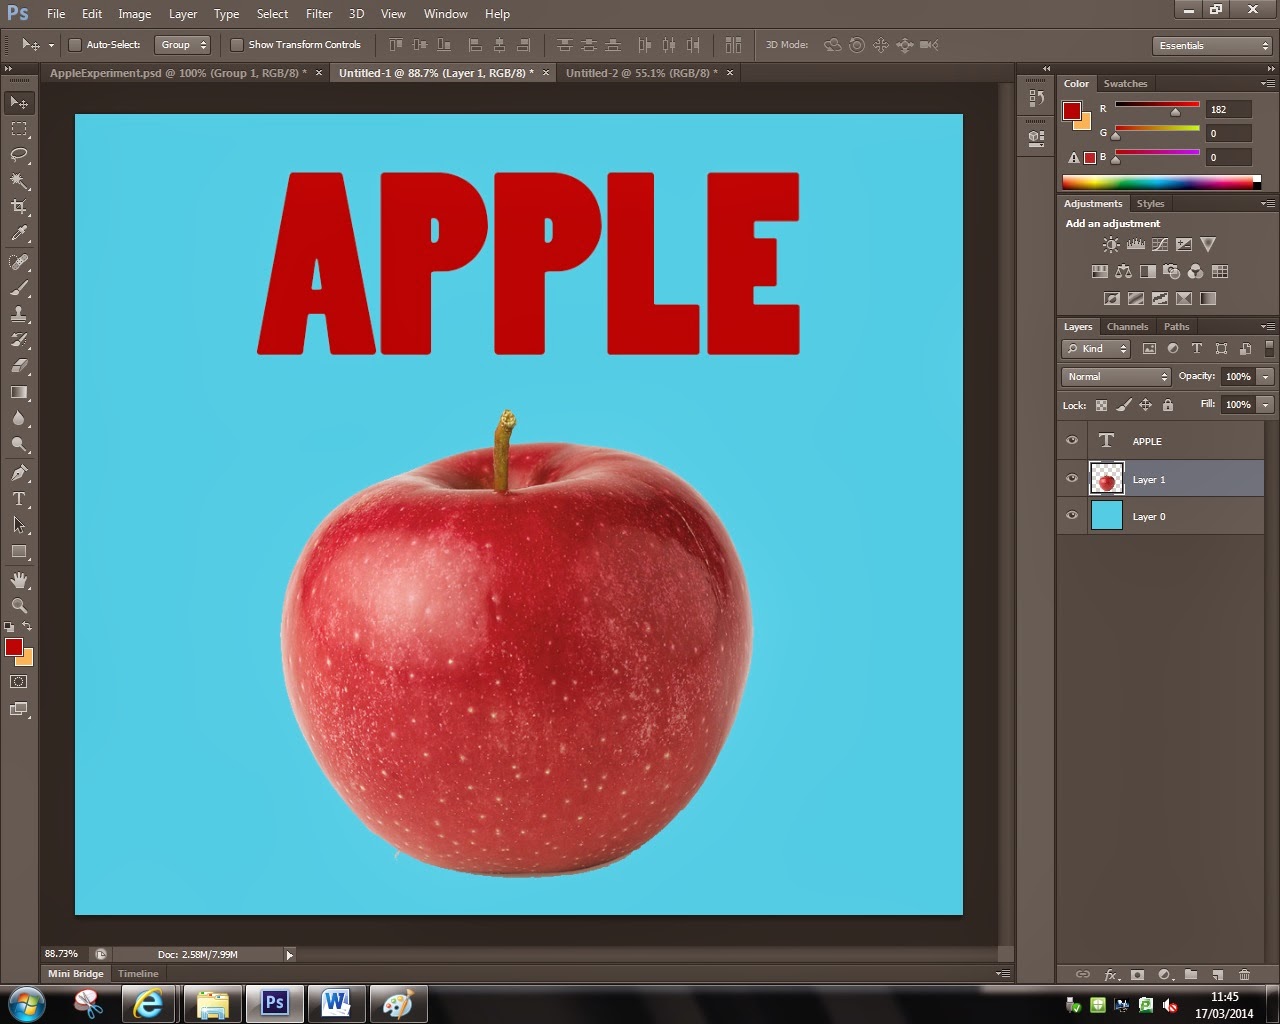
The first thing you'll have to do is find a picture/shape to mould your text into, type the writing ( font, color, size, etc.). I'd personally like it when the text links to the image because it shows the process of thought made to create the image. In this case I chose an apple and text that says apple.
STEP 2


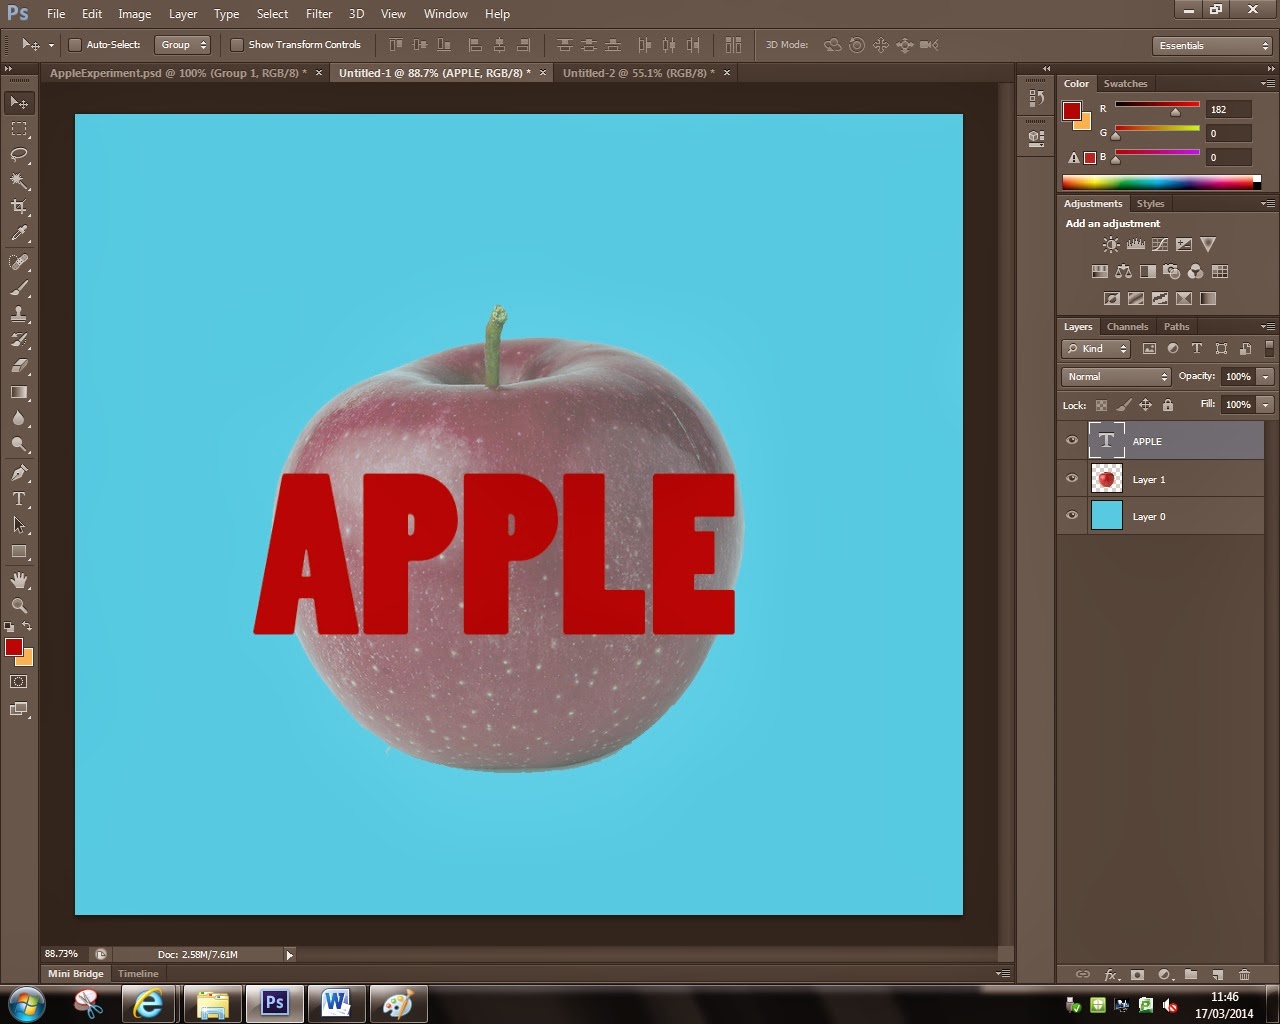
The next thing you will need to do is resize (Ctrl + T) the text so it's decently in proportion to your image. Bare in mind that the text needs to fit to the image so if it's too small it will be too stretched and if it's too big it will just be really hard to read. Decreasing opacity to the image will allow you to see the shape of the image so you can warp the text to it.
STEP 3


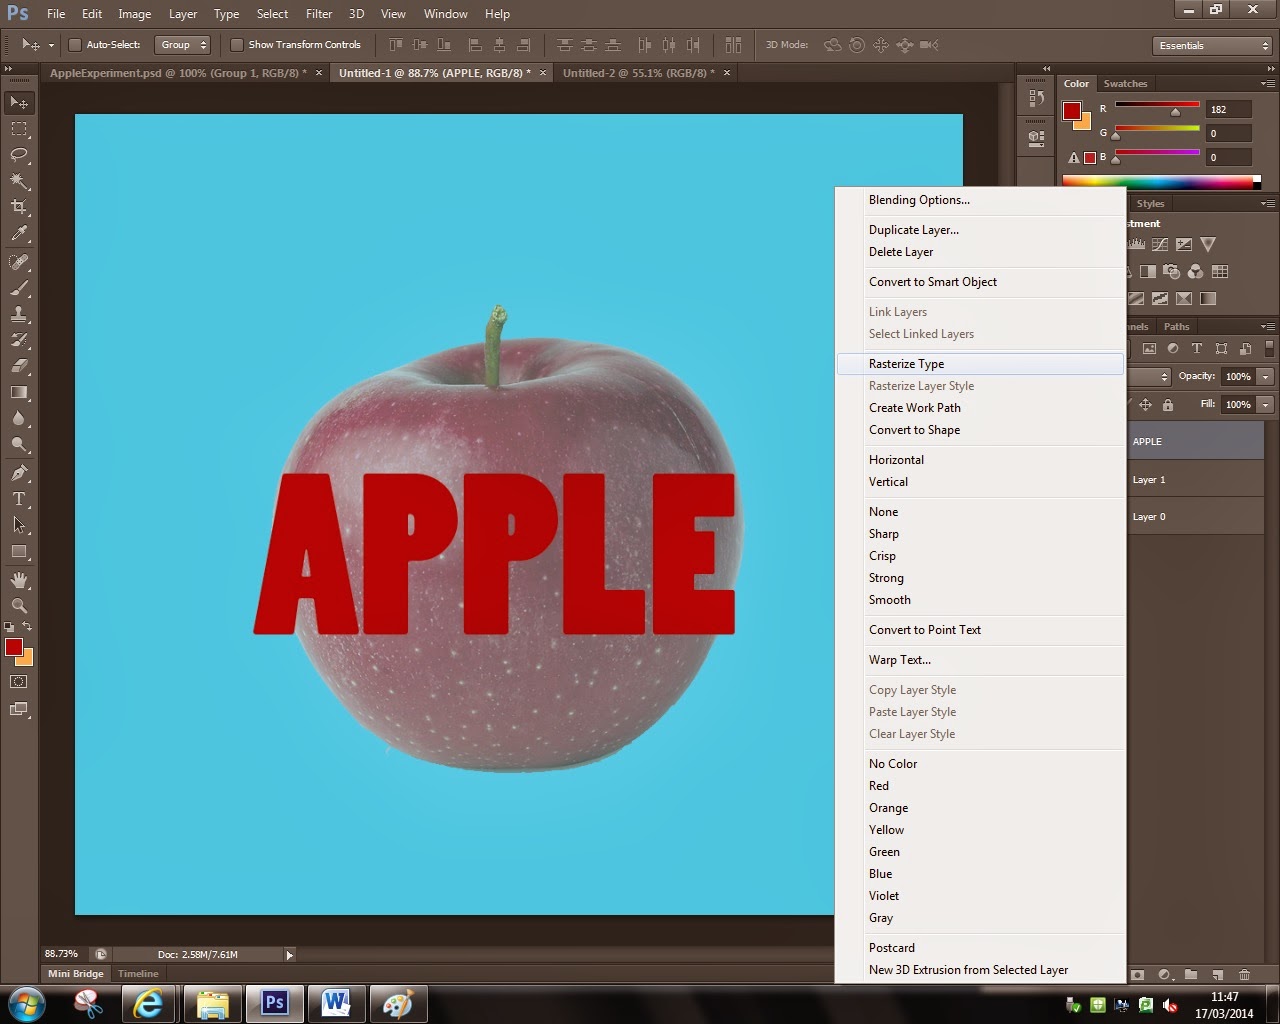
The 3rd thing you'll have to to is rasterize the text. You do this by right clicking the layer and clicking on the ''rasterize layer'' button. This converts the text layer into an image so now you'll be able to warp the image. Rasterizing the text is essential because it will make it much more easier for you to manipulate the ''image'' in any shape you want to.


STEP 4
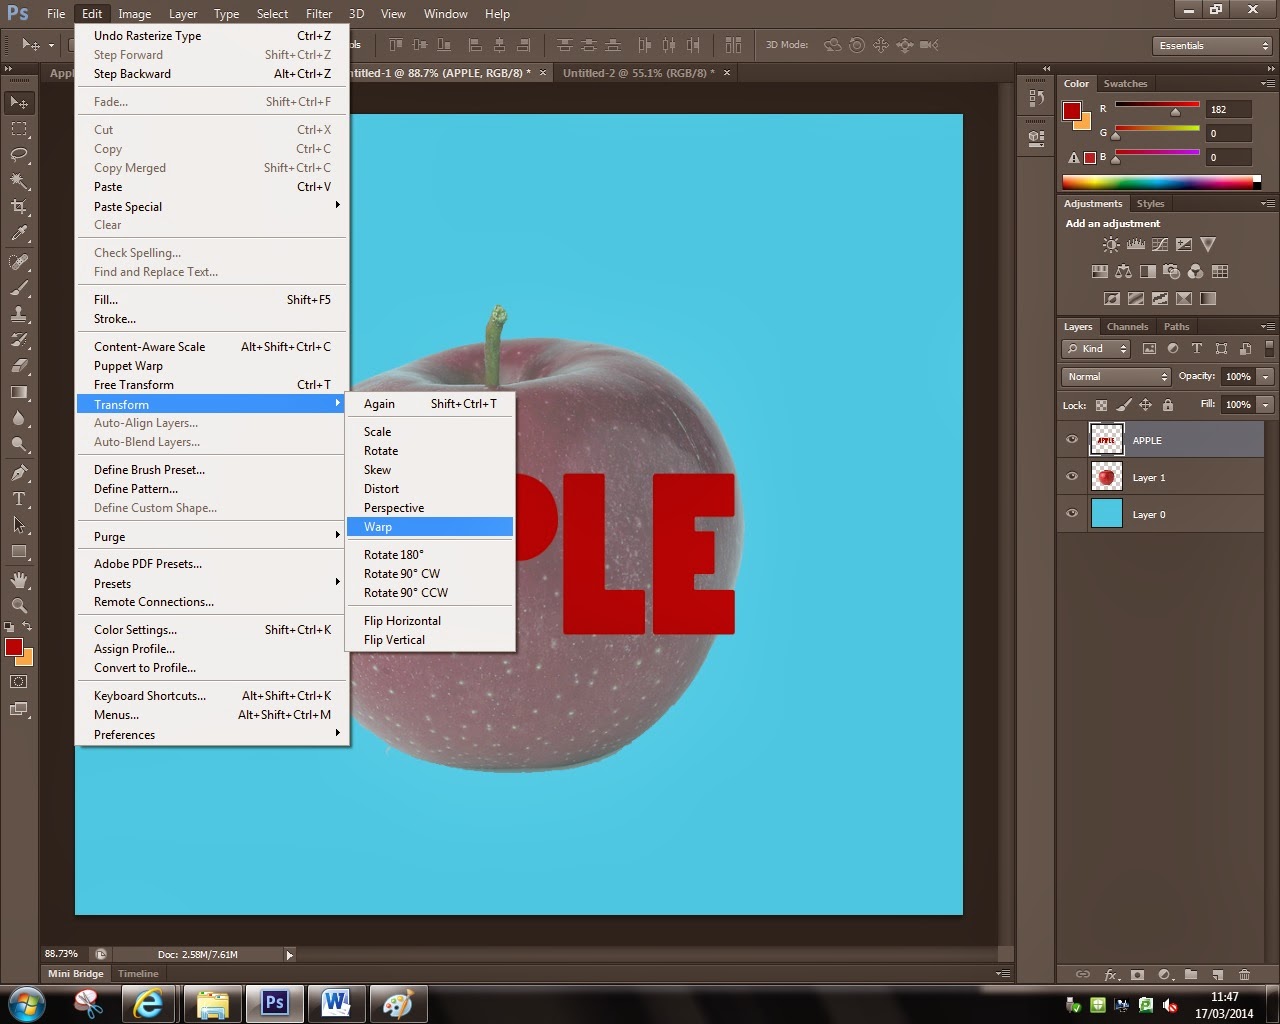
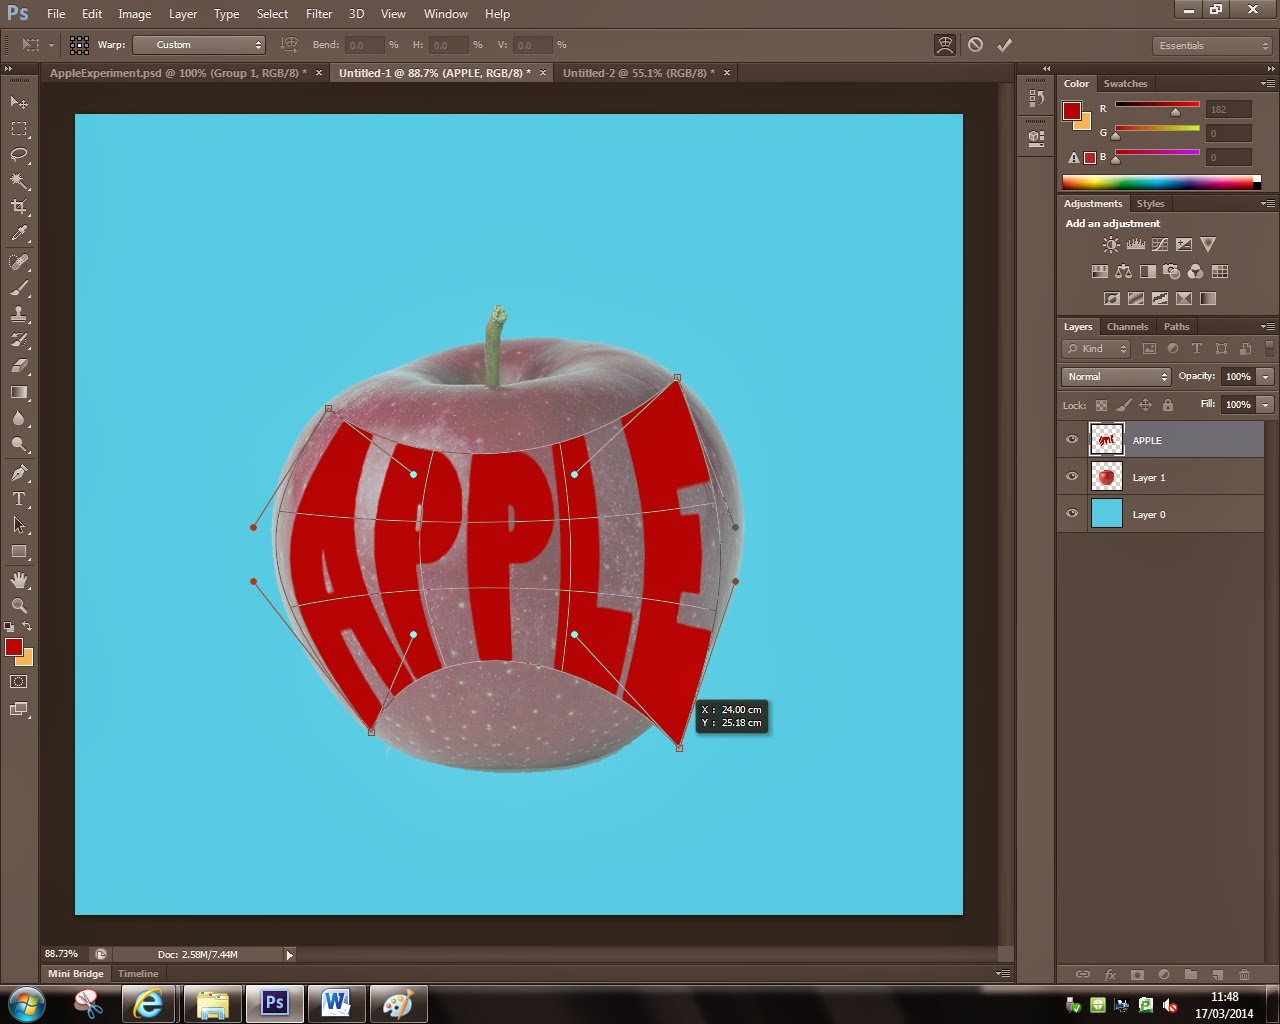
Now that you have rasterized your text you'll be able to warp it. You do this by highlighting the text layer, and going to edit -> transform -> warp. This will open the warping grid over your text and the warping can begin, as you can see in the next step.
 

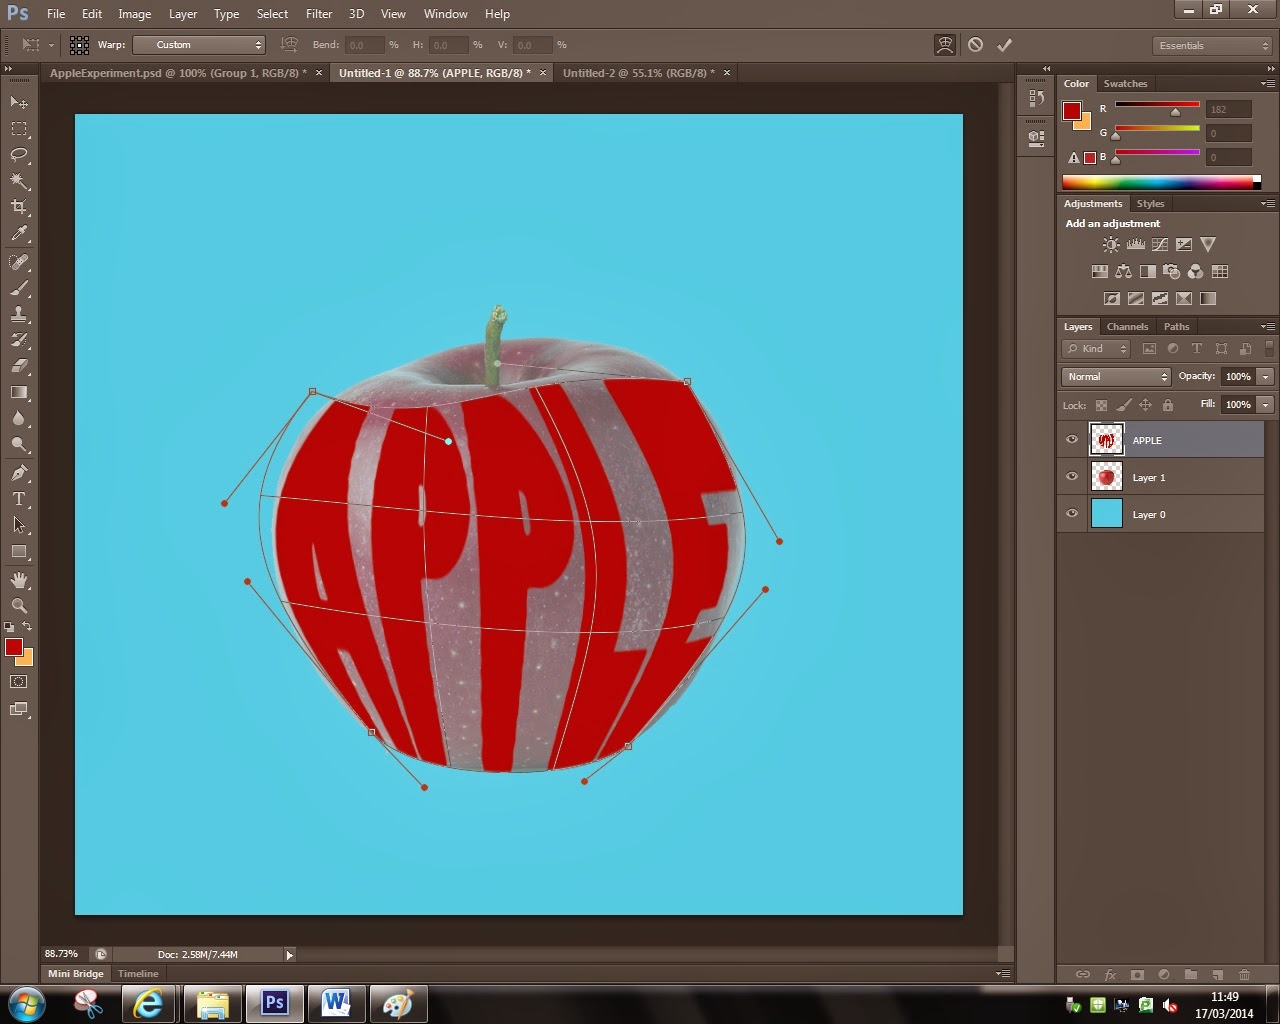
Now that the text warping grid has open you are free to experiment with this grid and see how this technique is  of use to you. You can use the corners to re-place the anchor point of the image, use the bars to warp the image around the anchor point or you can simply do it by just clicking and holding inside the grind and by moving your mouse the text will start warping.  You will start getting the hang of it after a couple of tries and be able to warp the text in any shape you want to.
After you've played around and got used a bit to the properties of the warping grid, try to mould the text to the image selected and make sure that it fits inside the shape. You might have to warp it more than once if the shape is much more complicated than just the one of an apple.
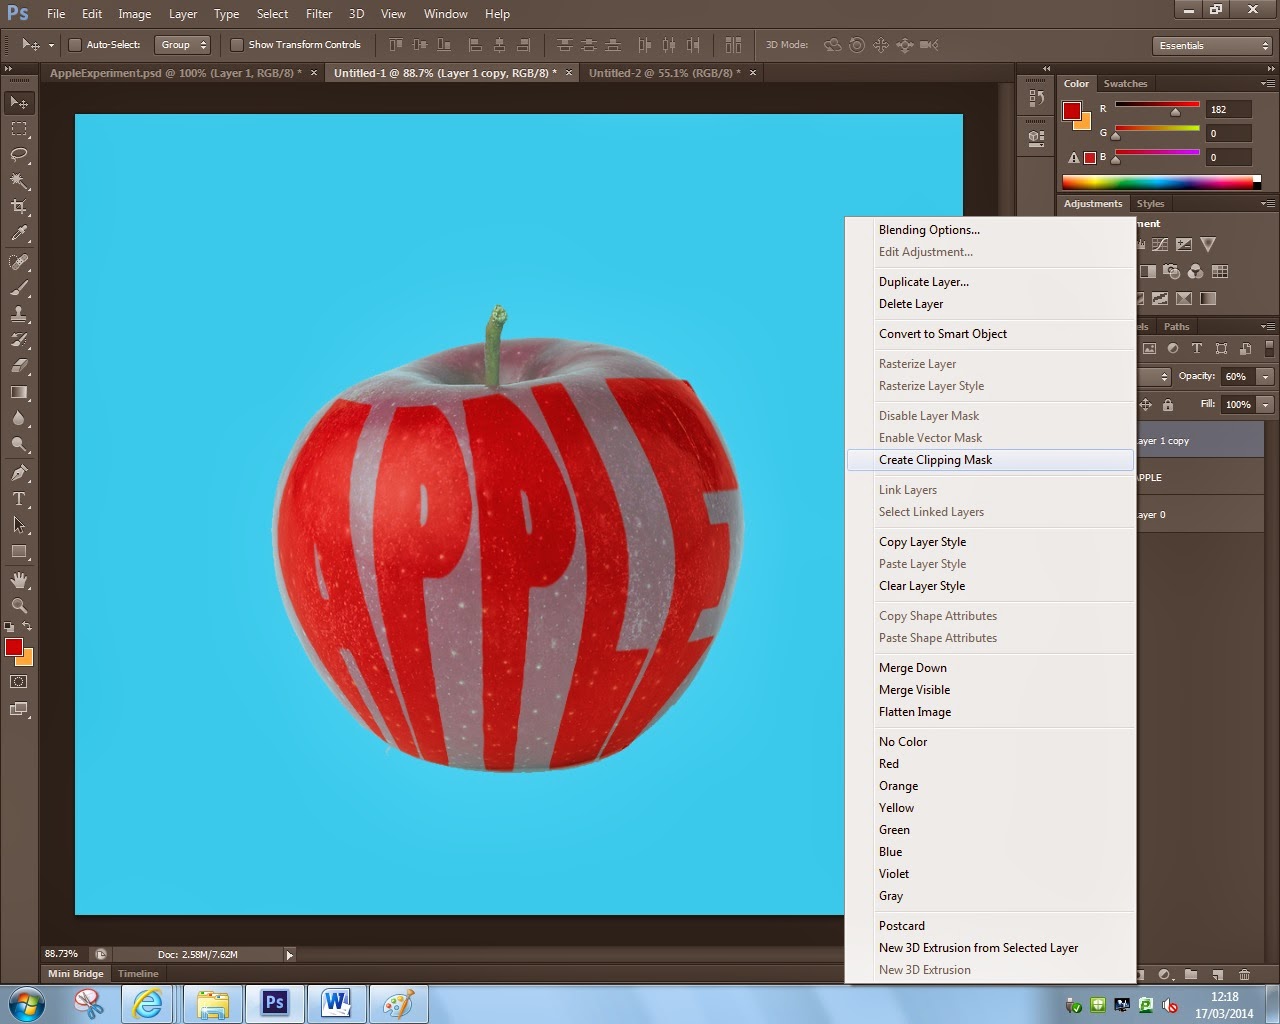
The next part was that I wanted to insert the image into the text. This is another simple process and it's very effective as it gives a much more realistic look to the overall image. You can do this by just simply clicking the layer for the image you have selected, right click on it and select the button saying ''Create Clipping Mask''. Make sure that the new clipping mask is above the text in the layer section. Now you'll be able to move the image around inside the text, re-size it, give it a different color and anything else that would interest you.
 

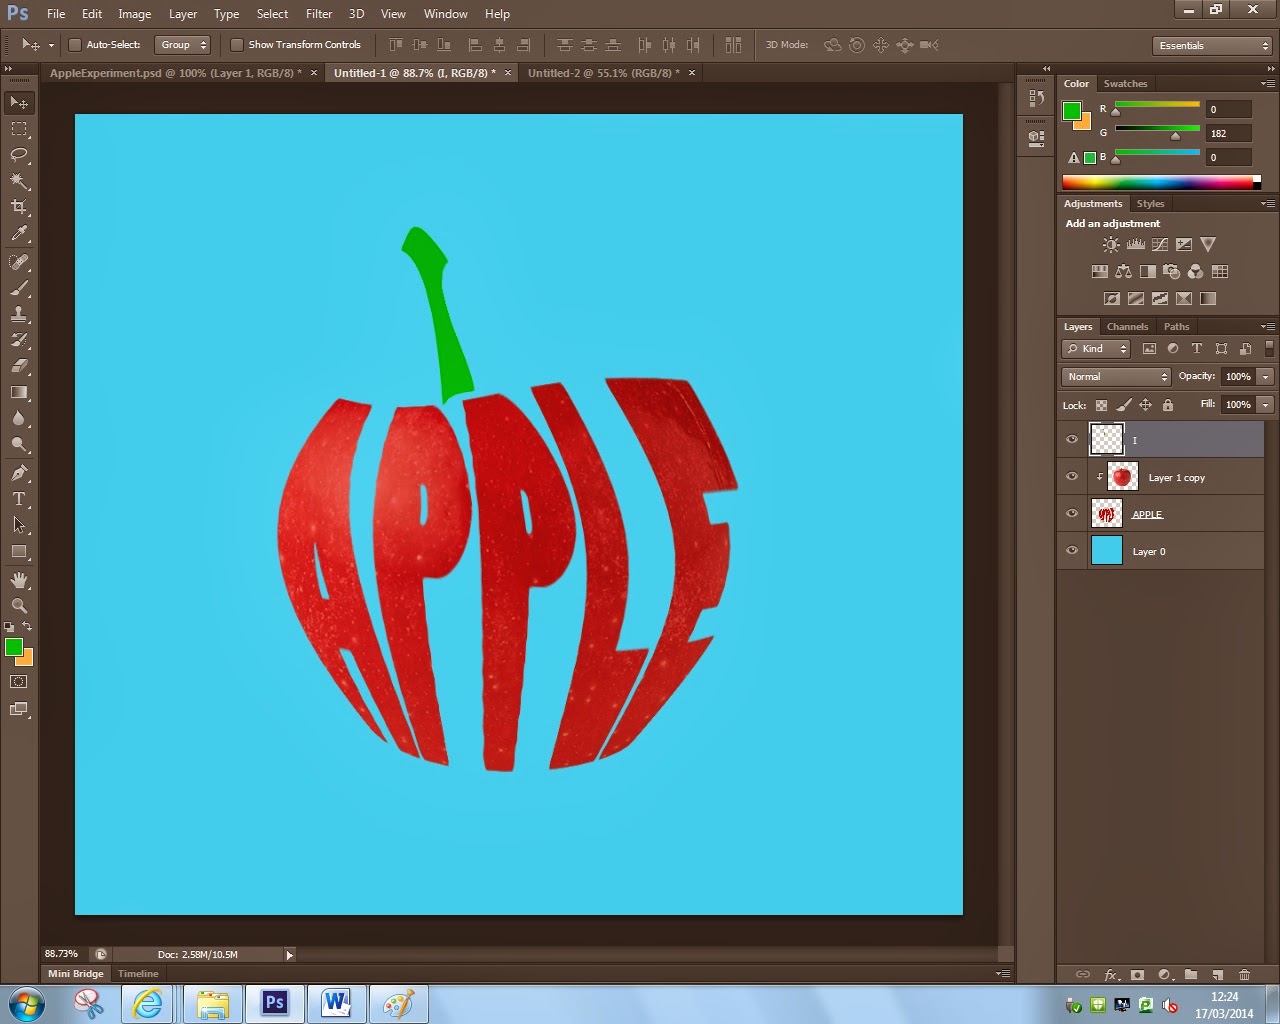
Now your image will look like this with the exception of the green stem. I made that exactly the same way i made the text. I used the letter ''I'' , rasterized it, changed it's color, and warped it into the shape of a stem of an apple. This technique could be used in so many ways it's unbelievable, experimentation and imagination will give ou some interesting results in the field of digital media.
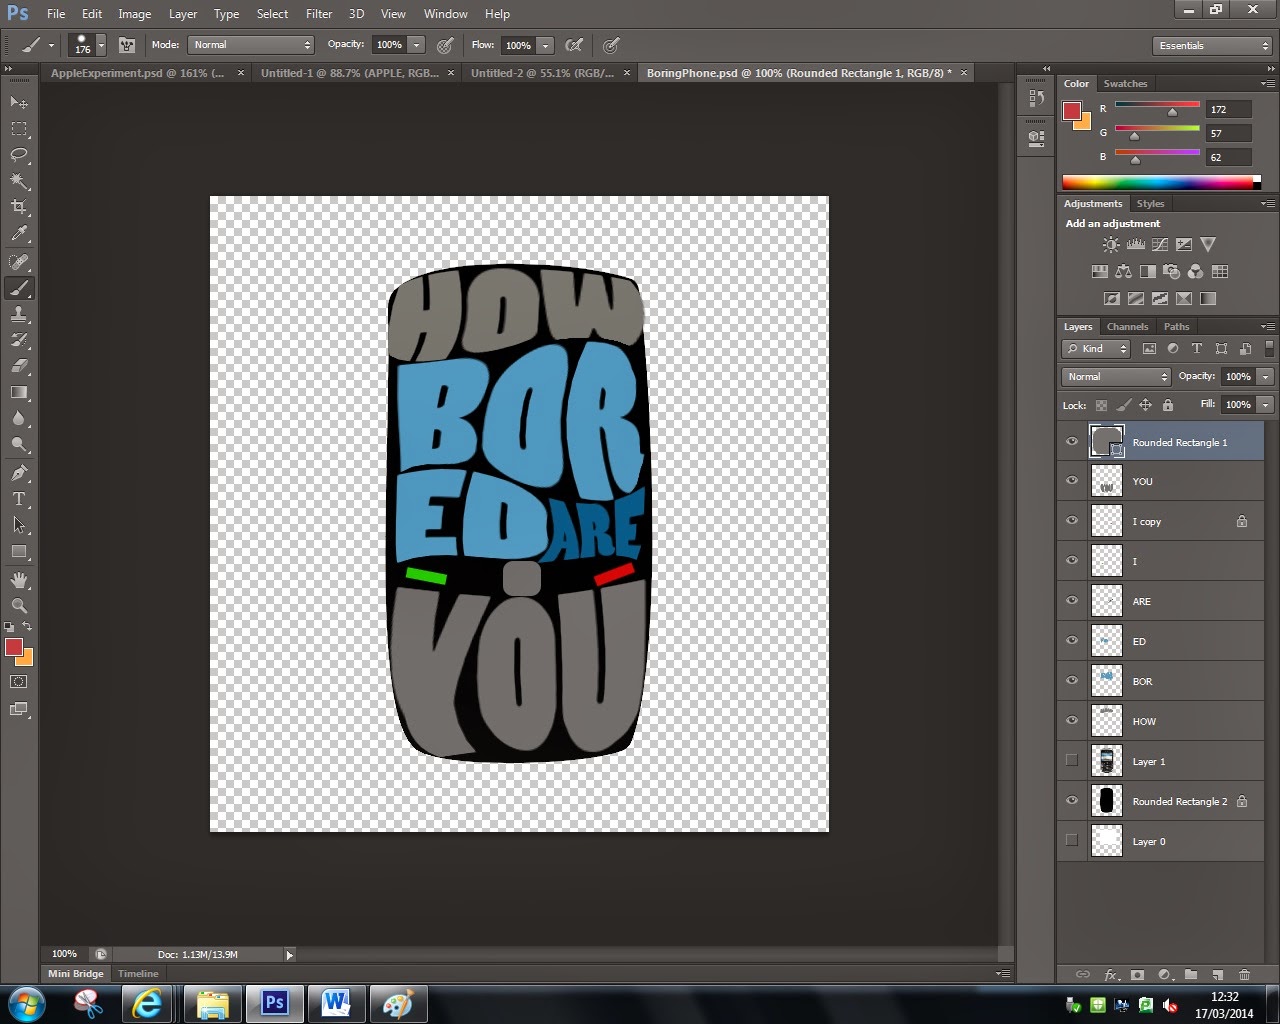
Here is another experiment of mine where i tried to use the shape of a Blackberry Mobile Phone and type text inside of it. The text relates to the idea of how teenagers have to always check tehir phones even if there's nothing new or incredibly intriguing fo them to find out about. I'm not that satisfied with this design because i's hard to tell that the shape is a phone and also the color scheme is too boring, but it's an experiment and it's a step in the process of creating something good.
 
As i mentioned in the beggining, this style is specific to the hippie 60's so i tried to create some kind of poster in a psychedelic style to see how it would look like. I am pleased with the asthetics of this design but the only thing ''out of place'' is that the text is just in the middle of the canvas with no borders or not on something(billboard or welcome sign). I did this from pure curiosity as this does not comply with the brief because it states that we're to create images from text.
 

Friday, February 28, 2014

Artist Research : MARY KATE McDEVITT

Mary Kate McDevitt


Here is some personal information about Mary that i found on her website:

Mary Kate McDevitt is a letterer and illustrator living and working in Brooklyn, NY. Mary Kate graduated from Tyler School of Art in 2007 with a degree in Graphic Design and Illustration. She worked as a designer at a studio in Lancaster, PA for 2 years. In 2010, Mary Kate moved out to Portland, OR to pursue a career as a freelance illustrator and artist, but after 3+ years in Portland, Mary Kate moved back east and is residing in Brooklyn, NY.

What attracted me to this artists work is the fact that it's cartoonish but complex at the same time. I really appreciate the fact that her work is mostly based on hand made drawings and with the use of traditional media, which is very clear in her work. 


1.)
1.) Some source materials that I can identify straight away by just looking at this image are sketches use as a template for the final piece, colored crayons or pastels for the background, letters and the rest of the elements in the image and maybe a finelner pen or ink for the really dark areas of the guitar or the shapes on the ''N'' . There are definitely many more source materials and traditional media that were used in the making of this piece but these are the most obvious ones I could identify.

It might seem that not many Photoshop tools have been used but I believe that such a creative piece of work was made with the help of digital media. Selection and move tools are the basic ones that might have been used to arrange elements on the page and resizing to make sure everything is as perfect as it could be. Layering, masks and opacity control we're probably used to give the image this poster texture that is noticeable on the boots and some places on the brown frame. 

Since it's the most important part of the image, the text is located in the middle of the image stretching almost over the whole canvas. Cowboy boots and a guitar are also visible in the image as they relate to the Southern American culture, Tennessee to be more specific. The image is placed on a brown frame and with all kinds of little details such as stars, rectangles and patterns occasionally floating around the main elements. In the background we can see a big yellow circle  with lines beaming out from the center of it, resembling a sun. Very vintage like and light colors have been used to fit the theme of a poster and the texture is very grainy, like it's been painted with a roller on a very rough wall.

I personally believe that the artists intentions were to create a ''promotional'' piece of art, the whole image is centered around cowboy American tradition and I think that in some way the artist was trying to capture this essence through the use of typography and her style of visually expressing herself.


2.)
2.)  Here's another piece where there is no doubt that the artist mostly relied on traditional media and source materials. I can say that the artist has used sketching as the main source material to set the base line for the start of this design. From there I believe she continued by adding the color and the little details by using  pastels or acrylic paint. Either way, the final outcome is as impressive as any other piece of her work because she represents in her work the old school way of doing it and by getting her hands dirty.

In the second stage, where the image was digitized, I believe she used the move and the selection tool to rearrange things on the page and make sure everything is where it should be. She also might have retouched areas with the brush tools and also she might have used layering and blending modes to give the image it's final finish for the post card like look in the end. 

This piece of work is totally based on typography as the main element of the image is the writing which cover almost all of the canvas. Little stars and circles which I believe try to resemblance snow flakes are also noticeable surrounding the text. Really light and calm colors are once again used, in this case to give the viewer the peaceful feeling of winter holidays, with the background being a light shade of blue, the stars and circles being black and white and with light orange and black for the text.

This is a perfect design for a holiday postcard, so I would say that the artist tried to create her version of the ideal holiday greetings card. I personally believe that this is a perfect design for a postcard because of the light color used and also because of the cartoonie style used on the text which would give the viewer a feeling of happiness and maybe relaxation.


3.) Because the artist usually works in a similar style, I believe that the source materials are similar to the ones used in the previous pieces of her artwork. Sketches were most likely used as a template to begin with and from there the artist started filling it in with color and the rest of the little details. I might be wrong, but I believe that the top part of this image was collaged and she continued by creating the part of the iceberg hidden underwater.

I strongly believe that this design has been refined and digitized in Photoshop, and some of the tools Mary might have used are: retouching  tools to give the iceberg a much more realistic aspect, blending modes, masks or opacity control to give the underwater background that cold and frozen texture/aspects for a much more intense aspect.

Once again the main element in this piece is the Typography part. The text is the first thing that stand out from the whole image because of the contrast between the other colors around it. After the viewer finished reading the text, he's attention is captivated by the rest of the image, but for a very short amount of time as it's quiet repetitive.
Really cold and dark colors have been used in this image, this because it has to relate to the really cold condition where you would see an iceberg.

This is a perfect example of the saying ''you've only seen the tip of the iceberg''. This is the artist expressing herself and trying to visually present her innerself by using an iceberg. We can see that on the lower part of the iceberg it says '' I Thrive Best'', which shows that even though you might not see it on the surface, she has that inner drive that pushes her forward everyday to do what she loves and improve herself.


3.)


Artist Research: CRAIG WARD

          Craig Ward


Craig Ward (born 1981) is a British-born, New York-based designer and art director primarily known for his pioneering typographic works and often scientific solutions to projects. A frequent speaker, occasional artist, published author and contributor to several industry journals, he has created award winning typography for a diverse array of clients across the advertising, publishing, fashion and music industries. His work has been shown and documented globally in countless magazines, books and exhibitions.

Craig is a very creative typographer that incorporates the essence in his most formidable pieces of work. He uses the properties of different substances, objects, elements etc. to give his work a very effective aspect that really shows his ability to be creative and also that he has the skills to do it.


1.)
1.)  I don't believe many source materials have been used in the making of this piece. Something that the artists might have done by free hand would be the silhouettes of the fork and knife with a pencil and have them scanned in afterwards. He could have also hand drawn the shape of the plate as a template for him and filled it with words after he scanned it in, but I highly doubt it because these would have been easier created in Photoshop with the pen tool.

This picture has been seriously digitally manipulated. Some tools that have been obviously used in the making of this piece of work are resizing and selection tools, the pen tool for tracing the shapes, maybe the brush tool for each individual name in the middle, blending modes and opacity control to give everything the grunge, painted like aspect an definitely the move tool to arrange everything in this quiet complex piece of typography.

The compositional elements in this image are the fork on the left hand side, the knife on the right hand side and in the middle the plate made out of names of countries from the world. The main element in this piece of work is the gathering of words in the middle as it's the most complex and impressive element of the whole image.

I personally believe that the artists intention is to represent how we are ''eating'' the earth of it's resources, we take and give nothing in return. This image has a very powerful contextual impact on the viewer and the artist has managed to create an impressive and creative piece of work

2.)

2.) I would strongly say that the artist hasn't used any source material at all in this piece. The only element in this image that I think is a source material would have to be the glass breaking if he captured the picture himself even though it would be very difficult to obtain such a powerful camera that can shoot so clear with so many frames per second.

From what I can identify, the artist has definitely used resizing and selection tools to control and place the text in the image,  retouching tools to alter any odd aspects of the image that would seem out of place and maybe gradient filters to give the image a much more vibrant overall look.

The image is made out of two main elements. The text that ''was'' on the piece pf glass and the actual breaking glass. Even though the artist uses such simple elements and a very basic concept the image is very effective. The artist chose white for the text and the background is dark shade of blue to complete the image and keep it as simple as he can. Here's the first example where we see the artist use the nature of an element with typography to create an impressive piece of artwork. The fact that the words '' You Blow Me Away'' are being placed on a breaking piece of glass really shows how the artist manages to express his creativity and it gives the piece a much more vibrant and it gives a kinetic feel to it.

The artist's intentions in this specific piece are to show how he uses juxtaposition in his artwork and how this makes it much more creative and interesting to watch.


3.) I can definitely say that an obvious source materials have been used in the making of this. Water colors or inks have been used to achieve that wet on wet effect which works really effectively with the text because they relate. The text might have also been hand made but I would question it because you could achieve that much more easier with the text tool in Photoshop.

Some Photoshop tool that I would have to use to achieve the same effect would have to be resizing, selection and the move tool to place the text and the ink splashes where I would want them to be, layering and blending modes to give the background paper like texture and maybe try some filters to see which would give the image a better final aesthetic. It's true that the image looks like the text was printed out and the ink was applied afterwards, but I am to experiment with how different digital media enriches the possibility of experimentation and this seems a great starting point.

The image is made out of the text on the page and the wet ink splashes around them. Only black and white was used in the making of this piece which helps him keep things as simple as possible. This piece of art was made out of pure simplicity and even though it seems like such a vague concept it's very effective and the simplicity of it is what give it such a captivating look.

Here we can see, just like in the previous piece, that the artist has used the properties of an element and linked it to the text to make a connection between the typography and the traditional materials used. In this piece, Craig has experimented once again with juxtaposition in his artwork to give it an entertaining and much more interesting aspect. 
3.)

Artist Research: JAMIE REID

       Jamie Reid

Jamie Reid

Jamie Reid (born 1947) is an English artist and anarchist with connections to the Situationist. His work, featuring letters cut from newspaper headlines in the style of a ransom note, came close to defining the image of punk rock, particularly in the UK. His best known works include the Sex Pistols album Never Mind the Bollocks, Here's the Sex Pistols and the singles ''Anarchy in the UK'' , ''God Save the Queen'' (based on a Cecil Beaton's photograph of Queen Elizabeth II, with an added safety pin through her nose and swastikas in her eyes, described by Sean O'Hagan of The Observers '' the single most iconic image of the punk era '' )


Jamie has a very unique style of arranging text on an image and his typography skills and methods of working helped him give the punk era an image. Because the artist is also on anarchist his work has a punk/rock aspect. He uses techniques such as collaging letters from newspaper and photographs to give his work a trashy and somehow messy style which worked perfectly when designing album covers for the Sex Pistols.


1.)
1.) Some of the source materials used in the making of this poster would have to be: old wallpaper for the background, maybe some original stamps and writing on the background, the ''bright'' and ''future'' fonts at the top of the poster we're maybe used from a newspaper, collaged elements. It is pretty hard to identify source material in this specific piece of work but I mentioned the ones i would use if i were to try and re-create this image.

I am not 100% sure about any digital media that the artist used in the making of this or if he used any at all. Photoshop tools like selection tools and resizing tools would be ideal for the first stage when creating something like this. More complex tools like the brush tool could be used to achieve the effect on the font and opacity & flow would be used to give the image a more refined final aspect

The compositional elements in this image are the two black cars in the middle, the text at the top and the bottom and also the background which gives an overall aspect/theme to he image. Very dull and vintage like colors have been used, such as light brown, black and dull red. 

I personally believe that the artists intentions are to raise awareness about the dangers of using petrol at such a high level and remind people about how hazardous for our planet is the fact that the vehicles we use have such a big impact on our environment.

2.)
2.) Source material that i'm sure the artist used at the time he made this piece of work are collaged sections such as the text and he probably also used a pencil or graphite to give the flag a more realistic appearance by adding the shadows.

I don't think that the artist used digital media in the making of this piece, but if i we're to attempt making my version some Photoshop tools of my choice would be resizing and selection tools, blending modes to give the image a canvas like texture, masks and control of opacity for a final retouched and refined  aspect.

This piece of work does not have as many compositional elements as the previous one but it's as effective and impressive like any other. The text is centered as it's the first thing the viewer should see when looking at the image. Other elements visible afterwards is the ripped flag and the safety pins holding it together. Again dull and simple colors have been used such as burgundy red and ''dirty'' blue which gives a punk aspect to the image to suit the band. 

The artist's intention was to create a punk/rock album cover for the band. He managed to do this really well because the design suits the band and it perfectly represents them. The ripped flag with safety pins holding it really captures the idea of anarchy and rebelion which the artists encapsulated in this historical piece of punk art.


3.) The text visible in the center of the image is definitely collaged which is part of Jamie's style and another source material used is the picture of queen Elizabeth.The flag in the background might also be a collaged element. From these pieces of work we can see that the artists is using more source material than digital methods of manipulating the image to give it a different effect, which is why I chose this artist because I want to see how digital media give me more possibilities to be creative and experiment with different tools and techniques.

Some Photoshop tools that I would consider using if i would try to achieve a similar effect would be: resizing and selection tools to begin with, experiment with different filters and masks to give the flag or the image of the Queen the desired effect, layering and opacity settings to give the image an appropriate and realistic texture. 

In this piece of work we can see in the center an image of the Queen in black and white with text over her eyes saying ''GOD Save THE QUEEN'' and over her mouth the name of the band '' Sex Pistols'' . All of this is in an oval on top of the union jack flag which has a realistic aspect because of the folds that mimic how fabric would behave like. Everything in the center of the image is in Black and White and the flag is in  it's usual colors. 

The artists intentions just like in the previous design were to create an album cover that would suit the image of the band. The name of the album is '' God Save the Queen'' so the artist cleverly used the image of queen Elizabeth, added the necessary text and the final touch which was the background. 
This is a historical piece of art in the industry of punk rock and the artist did a brilliant job since the image is still remembered today. 


3.)

Wednesday, February 26, 2014

Brief


 My Brief

 
In this project I was asked to create two final pieces. These are to be portraits and I am supposed to create them by using typography and text arranging skills that I will learn and experiment with along the way.

 
This project is also an extension of the previous one, where I have to experiment and see how digital media enriches the possibilities of artistic expression, but only with different media. (This being Typography)

 
The very first thing I should consider for the start of this project would have to be researching different artists and see how they used typography and manipulated text in their work. This will give me an idea of what I want to try and experiment with. I will research on various artists through the use of internet and books.

 
Some of the digital manipulating I will be doing in Photoshop is cropping, resizing, the brush tool with text, colors etc. I will also try to use traditional media such as sketches, photographs, oil paints etc.

 
I believe that my two final pieces will be well influenced by the research made and by the advice given to me by my teacher.

 
All of the resources I need to complete this project are provided to me by the school and I believe I will be able to complete the two final pieces with a decent amount of help and guidance from my teacher.